Episode Transcript
[00:00:04] Speaker A: Welcome to the weekend warriors home improvement show, built by bar lumber. When it comes to big or small projects around the home, Tony and Cory have got the know how and the answers to make your life just a bit easier. Here they are, your weekend warriors, Tony and Corey.
So last week on the show, we talked about hiring a contractor to build your deck. We gave you some tips and some ideas on things that you need to consider when hiring a contractor. But what if you don't want to hire a contractor and you're like me and Tony, you want to build that thing yourself.
That's what we're going to talk about today.
[00:00:47] Speaker B: There's a lot that goes into a deck building project, but it definitely is not a project that is outside the capability of a weekend warrior homeowner. Do it yourselfer.
[00:00:58] Speaker A: Absolutely. You know, in part of it last week that we talked about, one of the things was deciding what to do and what not to do yourself. And there are certain projects that I. I will look at that and say, no way, I am not doing that because it's outside of my realm of comfort zone.
For instance, I have a buddy who has a second story deck. It's, I don't know, 14ft up and it has six by beams and six by posts that go up. There's engineered posts, footings and all of these things.
I wouldn't feel safe doing a job like that. So I think what we're talking about today is the DIy deck. You know, the. The four to six foot off the ground deck with basic framing and basic decking. Maybe some railing. I think that's what we're talking about today.
[00:01:58] Speaker B: Yeah, I think so, too. A predictably attached deck to your home or maybe a freestanding deck that is moderately sized without multiple flights of stairs and high up off the ground. All of the, you know, all of the very simplest things we're going to cover, the simplest aspects of building a deck, things to consider and decisions that need to be made and all of that.
[00:02:26] Speaker A: Yeah. So it all starts with number one, planning and design. You need to think about what you're going to use the deck for, the purpose, the usage. You know, are you going to use it for entertaining, outdoor dining? Maybe you're just going to use it to relax. Like Tony said, you know, if you're building a deck that's 6ft off the ground and you don't need to go down to the backyard, do you need to build stairs? Stairs are a little bit more complicated. You're adding an elevate element of complication to something that you may or may not even need.
[00:03:00] Speaker B: Right. In addition to that, if you are 6ft off the ground, then a handrail is required and a handrail is going to be required down those stairs as well. And that gets even more complicated.
[00:03:12] Speaker A: You're right.
[00:03:13] Speaker B: Or it can, depending on your level of expertise, of course.
[00:03:17] Speaker A: Yeah. So it's something to think about. You have to understand what you're putting on the deck. You're putting a hot tub, are you building outdoor dining? Are you going to put, are you. Does it need to be large enough to put a table and chairs? I've talked about this before several times when we, you know, things to consider when building a shed.
How big do you make that shed? I say bigger than you think.
[00:03:40] Speaker B: Right.
[00:03:41] Speaker A: Way bigger than you think.
[00:03:42] Speaker B: Yeah.
[00:03:42] Speaker A: Because as soon as you put your stuff in there, you're going to want to put more stuff in there. And then you're going to go out to your garage and you're going to say, man, I wish my shed was bigger and I could put this stuff in my shed. And I think it's the same way with a deck. You build it, you get it done, and you go, man, I wish that I had more seating over there, or I wish I had the deck came out to here. So there are things that you can do when you're designing your deck to optimize the space and optimize the material for the materials that you're going to buy. One of the things that you need to consider is when you're talking about size and shape, is the length that you can buy decking and framing lumber in.
[00:04:26] Speaker B: That's a very good tip.
[00:04:27] Speaker A: You know, if you're designing a deck that's seven foot by five foot, you're kind of wasting material because deck framing comes in eight foot through 20 foot, two foot molts, deck framing. So eights, tens, twelves, 1416, 1820s. Now, keep in mind, 18s are not terribly readily available, depending on where you.
[00:04:50] Speaker B: Live, 14s as well as some cases.
[00:04:54] Speaker A: So you could say, all right, well, I'm gonna take ten footers and cut them in half. Okay, well, now all of a sudden you got to buy the decking. And if you choose to go with composite decking, composite decking only comes in twelve foot, 16 foot and 20 foot. So you need to really optimize the size of your deck for the materials that you're buying. Otherwise you just got a bunch of cutoff pieces that you paid for. That you paid for.
[00:05:19] Speaker B: And you can't always turn it.
[00:05:20] Speaker A: Yeah, you're throwing them away. Yeah. So if it were me, I wouldn't design a 15 foot wide deck. I would design a 16 foot wide deck, because that way I can maximize the material that I'm buying for the space that I have. As long as it fits. Right.
[00:05:37] Speaker B: Right. Having the plan going in is really the ultimate solution. If you know, if you know what you want and then you can size that to what's available, then you put those two things together and you end up with the most efficient and least expensive deck.
[00:05:54] Speaker A: Absolutely. And like I said, when we're talking about size and shape, obviously the more twists and turns and steps and things that you put into a deck, you're adding to the complexity, which means you're adding to the cost. So if you're going to bring the deck out and then you're going to step it down and bring it out even more and then step it up over here and then a sunken little area over there, every time you add those elements, you're adding cost and complexity.
[00:06:23] Speaker B: Right.
[00:06:24] Speaker A: So it's something to consider. The next one on the list is budget.
You know, I actually had materials as the next item and then budget, and Tony said, no, no, no. You need to consider your budget before you consider the materials. And I agree. So I bumped it up. And why do you say that, Tony?
[00:06:44] Speaker B: Well, because you're going to choose from. From materials that could be as little as $2 a foot to as much as five or six or $7 a foot. And if you fall in love with this beautiful, all low maintenance Azek decking product and you decide, that is the only thing I can have in my life, it's absolutely gorgeous. I love it. And then you find out that it costs more than you have to spend, well, then you're now you're. Now you feel like you're compromising. You never want to start the project out feeling like you're compromising. So find out what your budget is first and then determine what materials that you like will fit in your budget.
[00:07:28] Speaker A: Right. You know, if you're one of those people that says, I absolutely have to have real wood, and I want to either. I want to go with e pay. E pay. If you're familiar with the decking. Decking world, it's this very, very hard, exotic hardwood, and it's amazing. It's beautiful, but it caught. It's very expensive.
[00:07:47] Speaker B: Yeah.
[00:07:48] Speaker A: It's hard to install because it's super heavy.
It comes in odd lengths. Weirdly enough, like, last time I priced it out, they were like, yeah, this is random length only, and it comes five foot through 20 foot. So you could have gotten some five footers in there, some sevens. Weird sevens. Nines, because it's not manufactured here, it's manufactured overseas. So we're, we're bringing in on containers. And you really, when you're buying it that way, you're wasting lumber.
[00:08:18] Speaker B: Right.
[00:08:18] Speaker A: Because all of our deck framing is typically done 12, 16, 24 on center. And, I mean, you could adjust that, I guess. But anyway you look at it, it's, you're just adding complexity, which, again, adds costs. And when you're choosing those materials, sometimes they use more expensive fasteners.
[00:08:39] Speaker B: Right.
[00:08:40] Speaker A: You know, which is also needs to go into your budget. So when you're going into par lumber and you're talking to them about materials and you're working on your budget, a good thing to do is come up with a square foot price for approximately what framing is going to cost.
[00:08:55] Speaker B: Right.
[00:08:55] Speaker A: You can say you could take a plan, and if you've got a plan drawn up or you've gone to an architect and they've designed your plan, you can go in and say, okay, my framing lumber is going to cost about this per square foot. Come up with that number and then say, okay, I'm looking at these decking materials composite, that's 550 a linear foot.
Composite, that's $3 a linear foot. And then, you know, maybe this other one, that's $1.80 a linear foot.
What you do is extrapolate that into per square foot price, add in your fasteners, and that'll give you a rough idea. Because I'll tell you what. When you're going in and you pick out your material, like Tony said, you said, this is the one I want. You get all the way to the end of the project and you're five or six or $7,000 over what you thought or what your budget even allows for. Now what are you going to do?
[00:09:48] Speaker B: Right back to the drawing board?
[00:09:49] Speaker A: Yeah, you're kind of going doing that whole process again.
[00:09:53] Speaker B: It's disheartening. It's very difficult.
[00:09:55] Speaker A: It really is. So anyway, that's what I recommend, is going in, doing your homework on the materials themselves before you really set that right.
[00:10:05] Speaker B: And just, just so that it said at this level of the show here, at this point in the show, when you're budgeting, budgeting for a deck with handrail and budgeting for a deck without handrail are not anywhere close to each other.
[00:10:20] Speaker A: No.
[00:10:21] Speaker B: The railing oftentimes is more expensive than the deck than the deck itself. So if you were going to do anything, if you have a budget or a square foot price and you figure out what your it's going to cost you for your deck, just double it, double that price. And that will get you probably mostly any rail that you want.
[00:10:43] Speaker A: Yeah, it's, uh. The world of railing is so crazy. There are so many different types of railing, it blows my mind. And they range anywhere from $30 per linear foot of railing to $180 per linear foot of railing.
[00:11:02] Speaker B: Right.
[00:11:03] Speaker A: So really go in, look at them. And if that's the thing, if you're going in saying there's no budget, I'm building this deck and I want what I want, that's different. But if you've got a budget of $20,000 or $15,000 and you already know what you have to spend on the size and the deck of what you already have, then you can look at it. Okay, to fit into my budget, I'm going to have to go with this decking or a price of this and under, and a price of linear foot of railing from this and under. And we can show you those. We can show you the railings that fit into your budget. It's not just one. There might be two or three options. Sure.
[00:11:41] Speaker B: Absolutely. And then if all else fails, in the end, there's always the opportunity, of course, to build a wooden handrail. Definitely. More work, less money, more maintenance. A lot more maintenance. That's where the real downside is, ultimately.
[00:11:57] Speaker A: Yeah.
[00:11:57] Speaker B: But it doesn't take it off of the table. It still is an option.
[00:12:02] Speaker A: Yeah. It's one of the least expensive per foot.
[00:12:04] Speaker B: Yeah. And what? And, and the single most, uh, maintenance required.
[00:12:09] Speaker A: Oh, yeah, yeah.
[00:12:10] Speaker B: It's challenging.
[00:12:12] Speaker A: I had this whole conversation with somebody because they.
This was on a little vacation house that we're part owners with some. With some family, and we were putting a new railing on this deck, and it was all two by two. Cedar picket, cedar post, cedar top rail, sub rail, bottom rail, all the stuff, you know, and it was all painted, and it was just installed maybe five years ago.
[00:12:37] Speaker B: Really?
[00:12:37] Speaker A: So it looked pretty good. But it's near the beach and the weather is just unbelievably bad, so you have to maintain it all the time. Like you, he was saying you had to paint it every two years at the most. And we were talking, this was like 120 linear feet of railing.
And I got into this argument because I'm like, I don't want to have to spend every other summer.
I mean, three solid days.
[00:13:09] Speaker B: Painting the handrail.
[00:13:10] Speaker A: Painting handrail?
[00:13:12] Speaker B: Yeah.
[00:13:12] Speaker A: Three inch or, you know, four inches on center, two by two seater pickets. I mean, you want to talk about miserable?
[00:13:18] Speaker B: Yeah, miserable.
[00:13:20] Speaker A: So we ended up yanking it all out and putting in cable.
[00:13:23] Speaker B: Yeah, smart. Very smart.
That doesn't require maintenance. Very little, if anything.
[00:13:29] Speaker A: No. Yeah, pressure wash. That's about it.
All right. Last one in planning and design to consider is building codes.
Whenever you talk about a deck that is over a certain height, and I, you know, depending on the jurisdiction, usually it's like 8ft. When you get to that height level, your deck has to be engineered. So you're supposed to go in with a set of plans, take it to an engineer. They have to engineer it. Then you have to take the engineering to the code, to the department and get permits pulled on it so they can come out and inspect it.
And it's not just that. There's a lot of other things, requirements for jurisdictions that when you're building your, or designing your deck, you should follow all of those code, those building codes, and that's pretty easy. Usually you can call your local jurisdiction and ask them. There might even be a PDF that they can send you that gives you all of the requirements for your area.
[00:14:27] Speaker B: Yeah, it's helpful to know how far off the ground your deck can be before handrail is required. If you don't want to have to spend the money on handrail and you're not tied to a specific height off of the ground, or if you were thinking about maybe having it where you step out of the house, level onto the deck. But that's more than that. Minimum distance off the floor. Maybe you think about putting stairs right there. Two stairs or three stairs down to the deck from the house so that you don't have to put a handrail on it, um, that's all information you would get, of course, from your local building codes.
[00:15:07] Speaker A: Yeah, that's a good point. I mean, if you, I think it's like 30 inches around here.
So if you step out onto your deck and you're like, oh, I want it flush. I want to just step out onto my deck, and then by the time you get out to the end, it's 34 inches off the ground. Well, now all of a sudden you're looking at rail, right, that you're adding six or seven or $8,000 cost to your deck. Maybe it makes more sense to drop it down twelve inches and like Tony said, add a step or two.
And, uh, because every step is max, what, seven, seven inch rise seven inch.
[00:15:46] Speaker B: Rise, eleven inch step run or. Yeah, tread.
[00:15:52] Speaker A: Each tread is eleven inch. So, I mean, you could drop two steps and that's 14 inches right there. So you'd be well under that. Right, you know, requirement.
[00:16:01] Speaker B: Yep.
[00:16:02] Speaker A: So just something to keep in mind.
What's the next one, tone?
[00:16:08] Speaker B: Okay, so we're moving on from planning and design to the actual construction of the deck itself. And of course, just like any structure, the first thing to. To be done is the foundation. The foundation and the support framing that's underneath your decking. So the first thing you'll determine, of course, is, is how your deck is going to lay out.
Where is it going to attach to the house, what part of the house is it going to attach to? And then the joists come out from the house, and those joists sit on beams that sit on posts, that sit on footings. And those footings will have to be laid strategically so that your load is carried evenly across the whole deck. So I always start with a little piece of paper and I draw it out. This is where my. This is where my foundation points need to be, my footings, in order to carry the load from the deck. I think you don't want your footings to be any farther apart than about 8ft. And so, um. And you would have a row of footings underneath each of your beams. And your beams, um, will carry that load down to the footing. So the next step, of course, is. Is that the foundation and the footings?
[00:17:25] Speaker A: Yeah. And you can figure out, like, their span tables, you can talk to engineers and a lot of times the jurisdiction that you go to, they might even have a chart that says four by six, this many posts on center, this many beams on center. And that's good. You know, this is what you need to meet. Minimum, four by six, four by eight. Or in some areas, it's double Joyce. A double two by ten might make a beam or something like that. So just depends on where you are. But in the Pacific Northwest, we are where we are. Pressure treated lumber is what you would want to build your deck out of. And it's all made out of hemlock. Hemp or not all of it. You can buy Douglas fir pt, but a majority, a vast majority of the framing posts, beams and joists are all out of hemper and hemp.
[00:18:17] Speaker B: For.
[00:18:17] Speaker A: Is softer than Douglas fir. It's not as strong as Douglas fir, and it doesn't carry. It's not the same load ratings. So figuring out what to use and where to use them is very important. And it's funny, I always have. I have this builder that always sends me deck drawings, plans that I have to do takeoffs on.
And they'll have a deck that's like, say 3ft off the ground, and they'll put in these huge beams, like six by twelve beams, you know, spanning 16ft or something crazy, because they have to be these big beams.
And I'm like, the deck's 3ft off the ground.
[00:19:06] Speaker B: Yeah. It doesn't have to be a clear span.
[00:19:09] Speaker A: No. You put one more post in a pier pad and you've taken that from a six by twelve to a four by eight.
[00:19:15] Speaker B: Yeah.
[00:19:16] Speaker A: You know what I mean? Or a four by six, so.
[00:19:18] Speaker B: Right.
[00:19:18] Speaker A: It's kind of.
I see stuff like that all the time. And when you're talking to the salesperson at par lumber or, you know, whatever lumber yard, talk to them about the framing and those span tables and what the. The most cost effective way to build your deck is. I mean, if you have a second story deck in a patio downstairs, you know, in a big 60 slider. Yeah. You don't want to post right smack in the middle of that thing.
[00:19:49] Speaker B: Sure, of course, course.
[00:19:50] Speaker A: But in general, if you're building a deck that's two, three, 4ft off the ground, add a pier.
[00:19:57] Speaker B: Absolutely.
[00:19:58] Speaker A: It's crazy.
Now, when we're talking about the framing, you know, using the appropriate size, getting your span charts. The one thing to keep in mind, too, is the on center spacing for your joists. Now, you can use joists that are two by six, two by eight, two by ten, two by twelve, and two. The thing the difference is. So two by six is going to span a certain distance.
Now, if you stretch the distance between beams further out, then you'll have to go up in size. Two by six won't span, say, let's say 8ft.
[00:20:38] Speaker B: Right.
[00:20:38] Speaker A: And you want to go to two by eight.
[00:20:39] Speaker B: We're talking about deflection. So if you've got two by six, a two by six, you take a two by six and you hang it vertically between two beams, and that two by six is 8ft long. And then you walk out on it like a tightrope. As you get to the middle, you'll feel that, oh, it'll bow. Start to bow there in the middle, that sagging. That's called deflection. That is. That is when you get the weight on it, it's basically bowing down. Right, right. And so there's only a certain amount of deflection that's allowed before you need to bump up to the next size. So if you took a two by eight, then, or a two by ten, which is obviously wider than a two by six, and you hung that in there and walked out on it, you would see much less of that, or maybe not any at all. So that's what that whole thing is. You go from two by six to two by eight to two by ten to two by twelve. And those are stiffer joists, which carry more loads. And then if you have them farther apart or closer together, it's the same thing. They carry more load.
[00:21:45] Speaker A: Yeah, that's the other part of that equation. The size of the joist and then the on center spacing. If you have them six inches on center and then you put decking over the top, that thing is going to be rock solid. But if you put them 24 or 32 inches on center, you know, you walk across them, you're gonna. The decking is gonna bow between them, right. So you're gonna have that same effect.
So, composite decking, whenever you're building a deck out of, say, treks or timber tech, they require a minimum of 16 inches on center.
Some recommend twelve inches on center. So at stairs and in certain applications, if you're putting it at a weird angle, you have to go twelve inches on center. Framing cedar decking, which is two by six, can span 24 inches on center. So if you're replacing an old deck and you just want to, you know, say you want to rip the old surface off, framing's in good condition. You just want to put a new surface on.
And you say you're ripping off all this old cedar and you get it up and it's 24 inches on center. Well, you can't just slap trucks down on that. You'll have to go in and add framing in between those 24 to make it twelve inches on center. So you meet those minimum requirements. Because I tell you what, when you walk across a deck that is improperly built. And I did this, me and a bunch of guys rented a house several years ago for a bachelor party. We walked out on this deck and we were like, oh, my goodness. This thing was bouncing all over the place. And then we realized that it was framed 24 inches on center with decking tracks. Decking, it wasn't even tracks. It was some other off brand.
And then they put it at an angle so it wasn't spanning 24 was spanning like 30 inches on center. And one of our guys ended up falling through.
[00:23:33] Speaker B: Oh, man.
[00:23:33] Speaker A: I think I've told this story on the show before, but that's what I'm talking about. So it's just something to consider on center spacing. When you're replacing or building new, sometimes the.
The decking will determine your on center spacing.
[00:23:50] Speaker B: Right. Yeah. You were mentioning earlier a little bit about hardwoods like brazilian hardwood or ePay.
Some of those types of products actually do span 32 inches.
[00:24:01] Speaker A: Yeah.
[00:24:02] Speaker B: Whether you're going with a one by or a five quarter by or a two by, those, those spans can actually grow. That's very dense, hard, expensive, beautiful, gorgeous wood. But just across the board, it really, it depends on the product that you're using.
[00:24:17] Speaker A: Yeah. The other thing, Tony, with framing is when we're talking about railing, if you are installing railing, you need to consider the bracing and the blocking for where you're installing your posts, especially if you're putting in surface mount posts into this, through the surface of the deck.
You have to have adequate blocking underneath to accept the lag bolts or whatever you're lagging down into. Or if you're doing fascia mount posts, you have to have a thick enough beam on the outside to screw those into. And then we always recommend using Simpson strong tie DTt one z's or DTT two z's. You can look those up on Simpson strong ties website.
They're pieces of metal that will bolt through the blocking or the post and offer lateral support. That makes it very, very strong. Cause I don't know what the.
When you talk about that lateral load. So 500 pounds is it 500 pounds.
So it's supposed to withstand 500 pounds when you lean against it.
[00:25:30] Speaker B: Right.
[00:25:31] Speaker A: And it's not just a 500 pound person. Right.
[00:25:34] Speaker B: Right.
[00:25:34] Speaker A: Or a couple 200 pound people or whatever. It's. You got to think about that thing like a lever.
[00:25:41] Speaker B: Right.
[00:25:41] Speaker A: So up near the. At the bottom, you push on it. It's going to be a lot stronger until you get right out towards the top of that post, you're creating that lever action. So it's very important to get the.
[00:25:53] Speaker B: Proper block and then add to that the potential for inertia if someone is falling towards the rail or has been pushed towards the rail.
[00:26:01] Speaker A: Right. Rough housing.
[00:26:02] Speaker B: Yeah, a little bit. You never know what's going to be going on on that deck.
[00:26:06] Speaker A: Football catching.
[00:26:07] Speaker B: Yep.
Somebody hits that rail with a little bit of. A little bit of momentum behind them and, yeah, you. You reach that 500 pounds real quick.
[00:26:17] Speaker A: 100%.
Last couple things is on that. You know, we talked about the ledger board. You can use those DTT onesies there. One of the, the most shocking things that I've seen on old decks that were built are the way that they've been attached to the house.
That's one of the most important connections. Attaching it to the house.
[00:26:39] Speaker B: The single most important connection, in my opinion, the ledger.
[00:26:42] Speaker A: People want to build these big beams out further, far away, and put lots of hardware. And then I'll see them put little screws into the house or nails.
[00:26:51] Speaker B: I've seen ledgers nailed onto the house.
[00:26:53] Speaker A: Absolutely. With a little three and a half inch.
[00:26:56] Speaker B: A nail. Not even long enough to reach the framing structure of the home.
[00:27:00] Speaker A: Crazy.
[00:27:01] Speaker B: Yeah. Unbelievable.
[00:27:02] Speaker A: And that, you know, I've seen videos where people will get, you know, a little graduation party up there and everybody will squeeze together and put 2030 people out on the deck and snap a picture and the thing collapses.
[00:27:12] Speaker B: Yeah.
[00:27:13] Speaker A: And just think about that. If you've got a deck that's 2ft off the ground, it's probably not that big of a deal. Right. But if it's 6ft, 8ft, 20ft.
[00:27:21] Speaker B: Yeah.
[00:27:22] Speaker A: You're talking about potential death situations.
[00:27:26] Speaker B: Not good. So not a good situation.
[00:27:28] Speaker A: Properly fastening it, we recommend ledger locks. They're made by fastenmaster. Make a great product.
You can get them in three and five, eight or five and a half. So they go through the sheathing, through the ledger, through the sheathing, into the framing. You need to make sure you hit the framing on the inside of the house. When you're installing a ledger, you can't just randomly pick a spot.
[00:27:50] Speaker B: Right.
[00:27:51] Speaker A: And screw it into the OSB or the plywood. Very important. And then the last thing on there is the flashing. Got to make sure it's flashed properly. As water sheds down the side of the house hits that ledger, you need to have flashing over top of it, because if you don't, water is going to get back behind the ledger, in between the ledger and the house.
[00:28:11] Speaker B: That's right.
[00:28:11] Speaker A: It's going to rot out.
[00:28:13] Speaker B: That's right. That. That piece of flashing be like a z shape. It comes. It pokes up behind the siding. Depending on what kind of siding you have, maybe you have. Have to cut away your t 111 siding to poke it up underneath there. Gets in behind the siding, and then the water runs down the face of it and it covers over the top of the ledger and the water runs.
[00:28:33] Speaker A: Off that z shape flashing. You know what they call that?
[00:28:36] Speaker B: Z flashing.
[00:28:37] Speaker A: Z flashing.
[00:28:38] Speaker B: Z flashing. Z shaped flashing.
[00:28:40] Speaker A: Z metal. Mm hmm.
[00:28:41] Speaker B: Perfect.
[00:28:43] Speaker A: Easy one to remember. All right, let's move on to the materials and the hardware. We kind of touched on this a little bit. One of the things to consider is that you want to use treated wood. In our area, the Pacific Northwest. I said it before. Pressure treated was made out of hemlock. It's got. There's different grades of Pt posts. You can get ground contact. You can get in ground structural.
[00:29:09] Speaker B: And there's agricultural.
[00:29:11] Speaker A: Yeah, agriculture. And there's. What that means is there's different retention levels of the chemical inside that post. So if you've got a PT post that's being buried in the ground and it's holding up your second story deck, it's important that you choose the right one. You don't want to just use ground contact. You need to use in ground structural so that the retention level is enough that that post won't rot out. People have this mis, you know, conception that pressure treated lumber just doesn't rot, and that's false.
[00:29:41] Speaker B: PT will rot for sure, eventually.
[00:29:44] Speaker A: Eventually.
So having the right retention level of chemical in there is important. In another one, when you're cutting PT, you're supposed to use end cut solution. So you get, like a barrel, a bucket of it, or, you know, a can of it. A lot of people will brush it on. They'll dip a little brush in there and brush it on. The stuff smells awful, but it's important to do.
[00:30:10] Speaker B: Yep.
[00:30:11] Speaker A: Unless you want to be repairing and replacing the deck framing 15 years from now.
[00:30:17] Speaker B: I noticed that you put on here butyl tape for the top of the joists. Your joists, um, are underneath your decking, and your decking gets laid down on top, of course, of your joists. And then the water runs through the deck. And a lot of times it sits right there on the top of the joist. The water will just sit there. And. And a lot of times you have fastener holes that are in there, maybe even fasteners in there. And that water wants to run down that fastener and soak into that and. And cause it to weaken right there at the top of your joist. That will be the part of your joists that fail first. Yeah, the top of the joist where the decking is attached. Well, now they make a product, uh, called, um, Trex makes a product. Trex tape. We call it Trex tape. That's one good example. Butyl protector. I think it's called Joyce joist tape.
[00:31:02] Speaker A: Or something like that, two inches wide. And that's exactly what it's for. You run it over the top of the joist, you fold it over, and then when you put your decking down and fasten through it, it a. It does two things. It protects the top of the deck or the framing, so the water can't penetrate it in between the cracks and underneath the decking. But also when the fastener drives through the decking and through that butyl tape, it kind of acts like a little washer, and it seals around that fastener to really limit the amount of water that goes through and penetrates into the framing. So your framing stays dry and will double the life of your deck.
[00:31:41] Speaker B: They actually are making a new product now that act that, that rolls on, it's very thick, rubbery type substance. Yeah. Um, I think it's, you know, maybe it comes in more bulk, and, I.
[00:31:53] Speaker A: Don'T know, I haven't, I haven't seen that.
[00:31:54] Speaker B: I haven't installed it myself. But they're always improving and making the materials that you're using to build your deck last longer.
[00:32:03] Speaker A: One of the popular ones also is g tape. You've seen g tape, you actually stock it at your yard.
[00:32:09] Speaker B: G tape.
[00:32:10] Speaker A: G tape. It's like, it's this thin black tape, super sticky, rolls on top of everything.
[00:32:18] Speaker B: Nice.
[00:32:18] Speaker A: It's like flashing. Just keeps everything out, keeps it dry.
[00:32:21] Speaker B: I like it. G tape.
[00:32:23] Speaker A: The next one is fasteners. We talked about this a little bit. It's important to remember to use the proper fasteners for what your fastening into. So pressure treated lumber in Pacific Northwest is treated with copper, copper azole. And when you have fasteners that have zinc in them and you screw them into the PT lumber, two dissimilar metals. Chemistry here creates electrolysis and corrosion, and it will actually eat away at that fastener. Same thing with Simpson hanger. Simpson makes a special product for fastening to pressure treated lumber that they make out of copper. They call it ACQ or ACQ compatible. So make sure you're not using standard.
[00:33:16] Speaker B: Interior grade screws or, or even, or even galvanized screws.
[00:33:21] Speaker A: Yeah. You just got to make sure that it's, they're compatible to use with that sort of lumber. Same thing goes for the coast, you know, the Oregon coast, if you're putting in a deck at the coast, you want to use stainless steel. So it's just something to consider. You have to use the proper fasteners for and connectors for the deck that you're building. And then when you're talking about fastening the surface of the deck, they make tons of different fasteners, hidden fasteners, surface mount trim, head color matched. Yeah. So talking, talking through those with your lumber salesperson and coming up with the best solution. I personally like the hidden fasteners either, you know, even if you're installing cedar, they make these fasteners by camo. It's got this little tool, fastens onto the top, then they screw at an angle down on the side of the deck board so you don't actually see them. And one of the nice parts about those is when, especially when you're talking about cedar is camo. Camo fasteners are down on the side so you don't get water sitting in the holes.
[00:34:29] Speaker B: Right.
[00:34:29] Speaker A: So you got cedar deck with this little fastener in there that's, you know, a little 8th of an inch below the surface of the, the deck.
Those fill up with water and over the years they just start rotting from the fasteners out. So you, you want to extend the life of your deck, use hidden fasteners?
[00:34:47] Speaker B: Yep, absolutely. Very smart. It comes at an additional cost. If you were to use normal fasteners and fasten through the surface of your deck, that's, that's one cost figure another dollar a square foot probably, or something like that. Maybe even less, maybe fifty cents a square foot more to go with hidden fasteners. But in the end, it's worth it.
[00:35:09] Speaker A: I agree.
[00:35:09] Speaker B: In my opinion.
[00:35:10] Speaker A: I 100% agree.
All right, next thing to consider, safety features. We kind of talked about this a little bit. Railings.
You want to make sure that when you're installing a railing where it's required, if it's not required, then you can install whatever you want. You know, if you just want a little drink rail to put your, your beer on or whatever, that doesn't. That's totally different. But when you have to install a railing, and if it's over 30 inches off the ground, you have to ensure that a four inch ball, a four inch diameter ball cannot fit between any of the pickets or cables or whatever, you can't have any, any section of that deck rail further apart than four inches.
[00:35:55] Speaker B: Yes, that's right. I think the verbiage is a four inch diameter sphere. Can't pass between them. And so, yeah, that's a, that's that on the railings.
[00:36:06] Speaker A: It simulates a little baby head.
[00:36:08] Speaker B: Yeah. Stairs. To ensure that your stairs are properly designed with secure handrails, which can be challenging. I'll tell you what, putting railing on a staircase, for me, especially one that turns and turns and turns. Oh, yeah, man, oh man. It is challenging. It is a challenging, challenging thing to do. Um, and you definitely don't ever want to get it wrong. And there's rules and regulations about the, the top rail and your hand and it being able to slide down the handrail.
[00:36:44] Speaker A: Continuous grab rail.
[00:36:46] Speaker B: Yeah.
[00:36:46] Speaker A: Continuous, uninterrupted.
[00:36:47] Speaker B: Yeah. It's, um, it's a lot to, to know if you're going to build a rail that's going to be code compatible.
And it definitely is. It can be a challenging thing.
[00:37:00] Speaker A: But here's something with treads, and we talked about this earlier, rise over run. When you're calculating steps and stairs and you're cutting them, there's a range you can have. No, Max. It's like six and a quarter to seven inches on your rise. Max.
[00:37:17] Speaker B: That's allowable.
[00:37:18] Speaker A: And the tread is supposed to be eleven inches. Now, have you ever stepped on steps that did not meet that?
[00:37:25] Speaker B: Absolutely.
[00:37:26] Speaker A: And you almost trip and fall.
[00:37:28] Speaker B: You do sometimes trip and fall.
[00:37:30] Speaker A: Cause you're like, what the heck?
[00:37:31] Speaker B: Your brain knows exactly how tall a step is supposed to be.
[00:37:35] Speaker A: And when you hit that one, that's like seven and three quarter. And you trip and fall on your face.
[00:37:40] Speaker B: Yeah. It looks like a normal height step, but then when you go to step, your toe hits it and when your toe hits it, your whole body goes forward. Yeah. It's uh, it's a very weird. Or you're, you're stepping down and you think that you should have already reached the bottom of the next step and then your other foot is ready to move. Yeah. You can find yourself headed down the steps. Really?
[00:38:03] Speaker A: And it's the same thing if they're too short. If they're too short. If they're four inches, you know, then you feel like you're running.
[00:38:11] Speaker B: Yeah.
[00:38:11] Speaker A: Running up the steps. Like I'm not getting anywhere. What's going on here?
[00:38:14] Speaker B: Yeah.
[00:38:15] Speaker A: And the, the thickness, the width of the tread itself, I think eleven inches is code minimum. So when you're, when you're cutting stairs, it's very difficult. I don't think it's. I guess I wouldn't say very difficult. I would just say that it's one of those things that you should take your time, do some research, learn how to cut them and then proceed. I've done it only a couple times in my life and it took a, took me a very long time.
[00:38:42] Speaker B: Yeah.
[00:38:42] Speaker A: I got the proper tools. I got a square.
[00:38:45] Speaker B: But you took your time and you got it done right.
[00:38:46] Speaker A: Yeah. What are those little buttons called? Those are stair gauges.
[00:38:50] Speaker B: Yeah.
[00:38:51] Speaker A: Buy your set of self or yourself a set of little stair gauges for your square. $6.
[00:38:56] Speaker B: Yeah.
[00:38:57] Speaker A: Yeah.
[00:38:58] Speaker B: It's good. Yeah, it's great. It's a great process. It's a great learning process, for sure.
[00:39:02] Speaker A: One of the things in the safety section I put is lighting. Cause if you're running up and down your stairs at night, having, like, a little bit of a light there makes it so much safer.
[00:39:16] Speaker B: I'll tell you what. You know, it. The danger of moving around on your deck is. Can be exponential. Right. Let's start with just dark. It's hard enough already in the dark. If there's an obstacle, a toy, a dog toy, a dog bone, or anything that's in your walking path that you can't see because it's dark.
[00:39:40] Speaker A: Dog poop.
[00:39:41] Speaker B: That could very well be a trip hazard. And then consider the possibility of rain, wetness, or maybe rain combined with a little bit of moss growth or something that mildew, that's caused a slippery situation. There are. There's a lot of things that can make your deck dangerous if it's not. If you're not able to see where you're stepping all the time. So lighting is important. I'm really glad you put that on there.
[00:40:12] Speaker A: Yeah, my. My dog loves to poop on our patio. So I imagine if we had a deck, it'd be the same thing.
[00:40:19] Speaker B: It probably would.
[00:40:20] Speaker A: Sometimes you gotta turn the lights on and take a look.
The next thing on the list, Tony, is the construction process. You know, when you're. When you're laying out your deck, you want to make sure that the footprint is set up accurately. When you're digging your footings, make sure you're using string line and making sure everything is square before you start decking.
This is so important. You might think to yourself, it's good enough. But I tell you what, when you're throwing down 20 foot deck boards and you get about halfway down, and then you get to the end and you realize, oh, my goodness. I need to cut a obtuse triangle out of this deck board to fit the last piece.
You're. It's miserable.
[00:41:14] Speaker B: Miserable.
[00:41:15] Speaker A: We've done it.
[00:41:15] Speaker B: Yeah, we.
[00:41:16] Speaker A: You and I built a small deck. Mother in law.
[00:41:19] Speaker B: We struggled with that thing, didn't we?
[00:41:21] Speaker A: I know. We. I feel like we had to unscrew the deck boards at one point.
[00:41:24] Speaker B: I mean, ultimately, in the end.
[00:41:26] Speaker A: Well, here's the thing is, it wasn't attached. It was a. It was a.
What do you call that?
[00:41:31] Speaker B: Freestanding.
[00:41:31] Speaker A: Freestanding. It was freestanding.
[00:41:32] Speaker B: Yep.
[00:41:33] Speaker A: So we just had the heck of a time.
[00:41:34] Speaker B: Yeah, we really did. And the fact that we were building it in relationship to a building that was. I don't know, 50 years old. Oh, yeah. And it.
[00:41:46] Speaker A: Nothing was square.
[00:41:47] Speaker B: Yeah, nothing was square. So we. We definitely did have a tough time of it. We ended up. It stands today and it's beautiful. We did a great job, but it took us longer than it should have.
[00:41:57] Speaker A: Yeah. I think if we would have taken extra time to make sure that our footings and beams and posts were just all nice and square and straight and you strong string line, that it would have been a lot better.
[00:42:11] Speaker B: Right. I agree with that.
[00:42:12] Speaker A: Well, and partly too. I think what we did too is we didn't. We buried the posts and we didn't wait. We did it all in one day.
[00:42:18] Speaker B: Right. We did it all in one day.
[00:42:19] Speaker A: We should have buried the post in concrete and then came back.
[00:42:23] Speaker B: Yeah.
[00:42:24] Speaker A: After everything was set up and dry and hard.
[00:42:26] Speaker B: Yeah.
Speaking of the pouring concrete, I'm just going to jump in here really quickly with this one. Notable that.
That there is a frost line in the ground. And there is a recommendation to make sure that you dig.
Dig down below the frost line. Because if you don't get down below the frost line, then you can get heaving, which causes that to move all of that stuff around that's in the ground because it's not below the frost line. Have I got that right?
[00:42:59] Speaker A: Absolutely.
[00:42:59] Speaker B: No. Heaving is not good.
[00:43:01] Speaker A: I grew up in Michigan and we would have to put our fence posts and deck posts 4ft down. And here it's only 2ft. So in Portland, Portland area, 4ft down.
[00:43:13] Speaker B: To get below the frost line. Because if you just put. If you built a fence and you just put the post 2ft in the ground.
[00:43:18] Speaker A: Oh, yeah.
[00:43:19] Speaker B: The ground would just spit it back up.
[00:43:20] Speaker A: Basically. Within a couple of years. The whole thing would be laying down on the ground, basically.
[00:43:24] Speaker B: Yeah.
[00:43:25] Speaker A: You know, and I'll bet you it's probably the same in eastern Washington and central Oregon. Eastern Oregon, sure. It gets down in the snow and cold. I'm sure it's the same thing over there. But here in the valley it's 2ft.
[00:43:37] Speaker B: 2Ft.
[00:43:38] Speaker A: So. Yeah, you make a good point there. Next wing thing in the construction process is the tools. Make sure you have the proper tools. And, you know, we could probably talk another hour about all of the tools that you would be.
[00:43:50] Speaker B: Oh, yeah. Yeah.
[00:43:51] Speaker A: But it always is a good opportunity to go and buy a tool that you don't have. Since you're building the thing yourself, you're saving all that money. You can afford a new tool.
[00:44:02] Speaker B: Agreed.
[00:44:03] Speaker A: There's always a new tool for that project.
[00:44:05] Speaker B: Definitely gonna need a tool.
[00:44:07] Speaker A: That's when I stopped doing home projects, when I don't need any more tools.
[00:44:10] Speaker B: Well, when you got all the tools that were available, you just, that you just stopped.
[00:44:13] Speaker A: I don't have to buy any more, so stop doing it all together.
[00:44:17] Speaker B: That's when you start. That's when you start buying tools for me. You see, when you got the tool.
[00:44:23] Speaker A: Already, I'm amassing them for when my kids need help with houses.
[00:44:27] Speaker B: Just gonna give them all the tools they need.
[00:44:29] Speaker A: Just show up. Dad shows up.
[00:44:31] Speaker B: Hey. Proper drainage is also notable. In this instance. You want to make sure that the ground underneath your deck after you've built your deck is grading away from the home so that you're not going to get pulled up. Water underneath there.
It's, it's very important. It's going to be out of sight, out of mind, and you're not going to be seeing it or there's going to be, you're going to have no relationship with that ground underneath this deck unless it's high enough off the ground that you can get under there. And you need to make sure that you've properly treated the ground underneath drainage for one, two. Also, you want to make sure that you've gotten it covered with black poly or something that's keeping moisture from coming up out of the ground into the bottom of your deck. And also other foliage from growing underneath there. That's just going to cause havoc underneath the deck.
[00:45:18] Speaker A: Yeah. Yeah.
[00:45:19] Speaker B: You want, people don't realize cool and dry underneath there.
[00:45:22] Speaker A: Sun will shine through your deck, through the cracks. And as it's moving across the sky, you'll get tons of grass and weeds growing up through your deck.
[00:45:32] Speaker B: Right. Yeah, you don't, you definitely don't want that. That's not good.
[00:45:35] Speaker A: Yep.
All right, now to down to the nitty gritty. The finishing touches. The last thing. You've got the deck framed. You've got it decked. You've got the railing on. Yep. You know, there's just a few more finishing touches that you have to consider. If you've gone with wood, you said, I love the look, the smell of wood. I want to, I want to go with that. Now you got to keep in mind the maintenance schedule. You need to think about what you need to do to protect that wood. A lot of cedar that you buy is not kiln dried decking. Cedar decking that you buy, especially here in the Pacific Northwest, you're gonna buy is gonna be green. Well, they recommend letting that season for at least a year before you put a coat of sealant on it. So don't do it this year. Do it next year. If you do buy kiln dried, then it's okay. You can seal it right away, but you wanna use some penetrating oil. If it's gone too long and it start to grayed out, you can buy some wood brightener, clean it up, but you want to keep a good quality sealant on that thing. If you want to extend the life of it. It's gonna, it'll probably last a long time, but it's gonna gray out. It's gonna get slippery. It's gonna look kind of crappy.
[00:46:44] Speaker B: Yeah. I mean, you might be restaining, cleaning, letting it dry, and restaining.
Maybe every year, at the very least, every other year.
[00:46:55] Speaker A: Depending on what product you use. Absolutely.
[00:46:57] Speaker B: And depending also on, you know, what you've got going on around your deck. If you have tall trees and it's very socked in and, you know, it's getting a lot of foliage, then it's going to require more attention. If it's out in the open and the sun is beating down on it, you know, all year long, it needs a different amount of attention. So every situation is a little bit different. But make sure that you are fully prepared for what you need to do to keep your deck in tip top shape.
[00:47:28] Speaker A: That's right.
One of the things I talked about earlier is lighting. One of the finishing touches on any deck is electrical. If you're considering putting on lighting or you want to have some sort of deck lighting out there, maybe some speakers or whatever. Time to think about that. I would probably consider that before framing, so that if you need to run any conduit or anything like that under the deck, it makes it a lot easier to take care of that beforehand. And the last thing on the list, Tony, is decoration.
Furniture, planters, any, any of those sorts of things. A table, chairs, umbrella.
Have you accounted for that in your budget? That's the question.
[00:48:14] Speaker B: Or does it have to wait until next year's budget?
[00:48:17] Speaker A: Might have to.
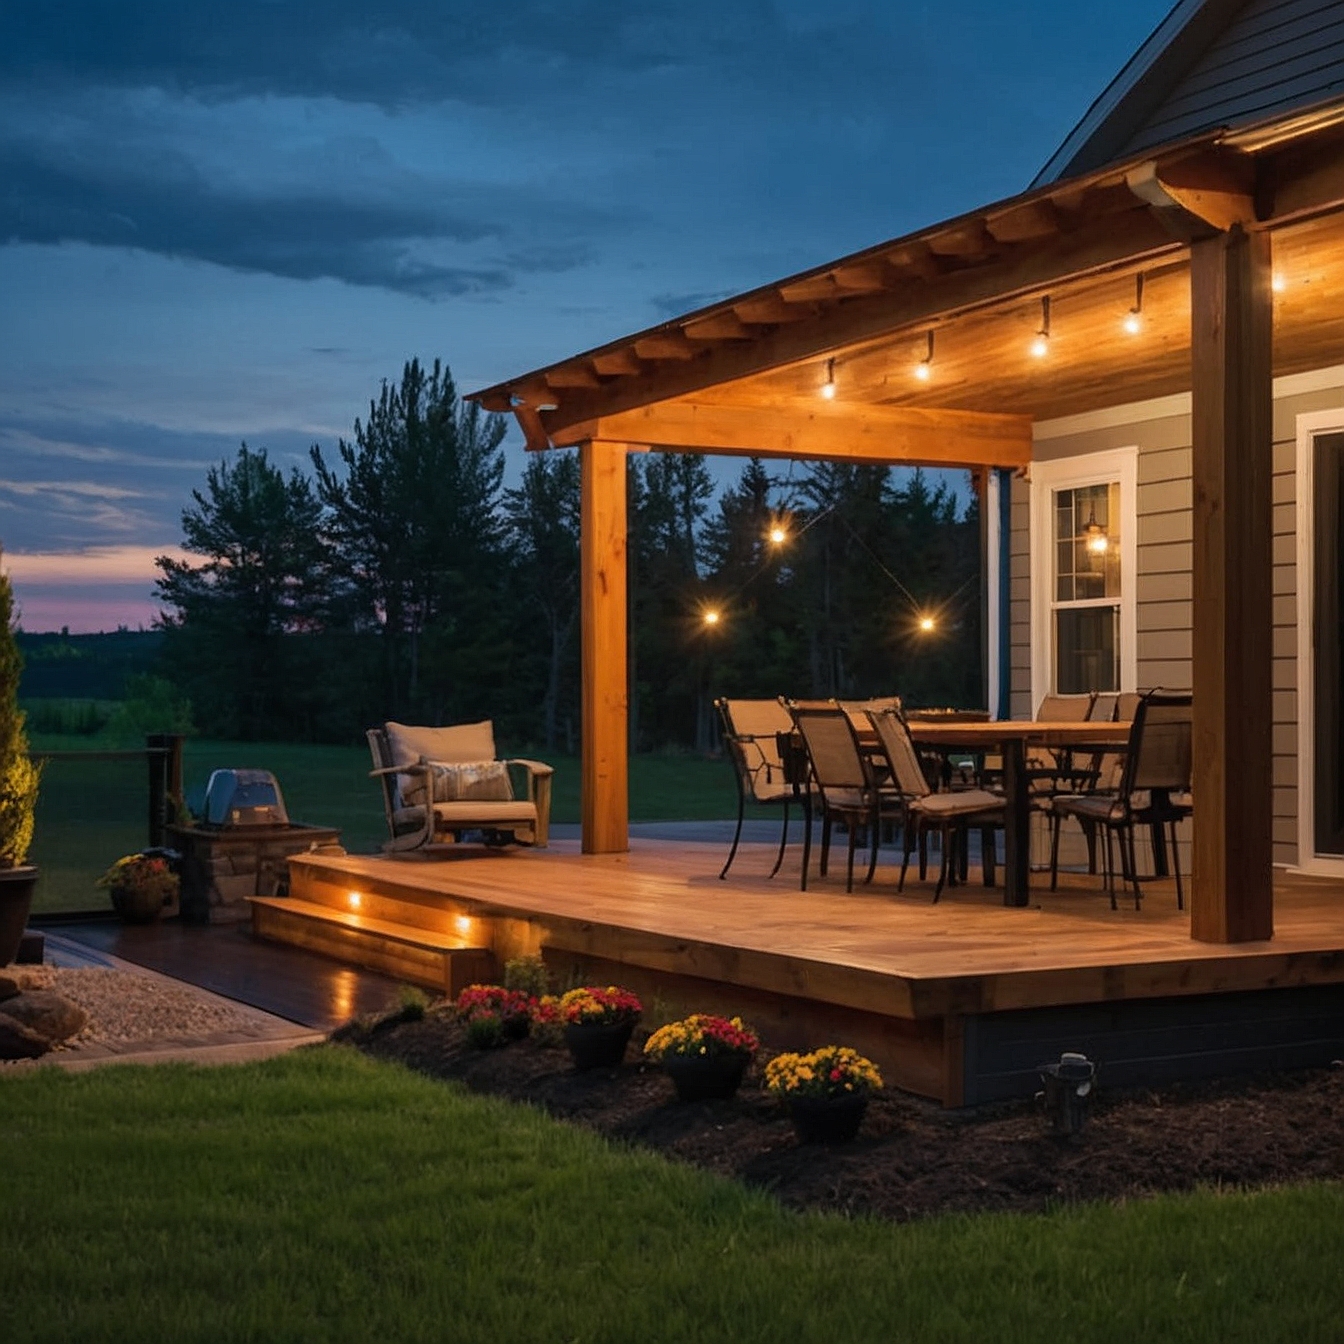
[00:48:18] Speaker B: I mean, you know, that's the very fun part, going out to the store and finding all of the, all of the accessories that you're going to have on your deck that make it the most amazing place to entertain or just relax or whatever it is. But I definitely love the time spent on the back patio or on the back deck. It's awesome. Especially this time of year.
[00:48:40] Speaker A: Yeah. Outdoor living the Pacific Northwest is nothing better.
[00:48:45] Speaker B: Nothing better.
[00:48:47] Speaker A: Anyway, if you feel like we missed anything, let us know. Send us an email we're at weekendwarriors.com. if you know anybody building the deck, send them a copy of this podcast. Let them listen to it. Give us some feedback. Make sure you hit that subscribe button. Thanks so much for listening.
[00:49:05] Speaker B: Have a great week.